Modern life, in my opinion, is lacking in many areas. I feel like it has become progressively more distant and disconnected from the natural world. Which has tremendous benefits… but they come hand-in-hand with increasing drawbacks as well. I feel like we have lost that basic elemental connection with our surroundings– an understanding of what it truly takes to live in the world. We go to work all day in order to make money so we can turn around and buy what we actually need and have no sense of making or producing what we need. In essence, I believe that people are psychologically starving themselves of the joy and satisfaction that comes from producing and using everyday items in their life. I would like to describe the benefits of making things yourself, why I started this website, and why I believe you should learn a traditional craft. . . or two. . . or more!
Satisfaction:
Do you know the satisfaction
and pride that comes after spending all day doing yard work and
making your house look significantly better? Successfully renovating
your own kitchen? Using the furniture you built yourself? There is
simply more pleasure that comes from activities that have a tangible
result– the ability to look back at the day and see what you
accomplished is VERY rewarding! I don’t think we all need to resort
to manual labor though, hobbies where you actually produce something
that is both functional and beautiful generates the same sense of
pride. Learn basketry, take up pottery, develop basic woodworking
skills, start foraging wild edibles for one meal a week. It doesn’t
matter what, just learn something! For me, it has always been a
combination of being fascinated with traditional skills and having
the drive to learn how to provide for myself based on my own
ingenuity. I also enjoy the connection it brings to the things in my
house and the world around me. You never quite look at the stuff you
have in your house the same after you begin making it yourself–
you’ll be trying to figure out how they did the joinery on the legs
of your table, or wondering what was used to apply texture to certain
pottery mug and how you can replicate it.
Personality/Individuality:
Lets face it, handmade is beautiful. Surely you’ve noticed that handmade or handcrafted items are making a comeback these days. People seem to be arriving at the point where they want something more than the soulless uniformity of mass production. I know of several blacksmiths that are making a good living these days, just a couple decades ago who would have thought that would ever happen? Smithing had effectively been relegated to the antiquated dustbins of history a few years ago, it was a trade kept alive by a few stubborn individuals who persisted on beating on hot metal in their garages for fun, but now it is increasing in popularity and can actually be a decent business. And it’s not just blacksmithing either, all the artisan crafts are making a resurgence: think of bread, just a few years ago we didn’t have any true “artisan” bakeries in the area I live, now I know of two within a 20 minute drive that make delicious, traditional, crusty artisan loaves. Why the switch from generic white grocery store bread? Is it the product or do they like feeling like they have a connection with the person that made it and the atmosphere of traditional shops? Good question… Maybe people just got bored being the same as everybody else? At any rate, the things you decide to make will be totally unique and truly beautiful. . . To you even if no one else thinks so!
Quality:
I’m not going lie and say making your own it will be cheaper than storebought. You can buy low quality imported stuff for a fraction of the cost it will take you to make your own. But I like quality…. and frankly I usually can’t afford quality. Another consideration is the ability to repair what you make when it wears out or breaks, if you made it you know how it goes together and can figure out a way to fix it. If you have no experience with basketry say, you will have no idea how to patch a piece in and make it work again! But back to costs, you really need to compare cost of what you make to what it would be for comparable custom work, not a cheap knock-off. If you want to learn to make a pair of scissors, don’t go comparing them to kids 50 cent plastic craft ones, look at what a nice pair of handmade scissors would be. Of course, that’s not to say that what you make will be quality when you start– it almost certainly won’t be– but it can become so if you’re willing to put the time in to learn! In all honesty though, this is really about creating things of value in your own life. For yourself to enjoy. That’s one reason I got started in knife making 6 years ago, I liked custom knives and thought they were beautiful…. but couldn’t afford to buy one from a custom maker. I would have learned to make one anyways because they are very functional tools and I enjoy making things, but to also know that I could make a half dozen knives for the cost of buying a custom one is a great bonus! This, of course, puts no valuation on the time you spend on learning and making. . . but you probably needed something to do tonight other than watch a movie right?
Creativity:
I’ve never considered myself a creative person. But to make something and then say “I wonder if changed this…” I generate a LOT of ideas this way. I probably have 4 dozen different bows I want to make. Local woods I want to try out, designs/styles to attempt, different backings and finishes to compare, etc. Do I need 50 bows? Absolutely not. . . But I want to make them just to try out my ideas! Creativity is one of those increasingly atrophied mental muscles of our society, and like any normal muscle I believe that it is developed through use. You get better at coming up with ideas simply by. . . coming up with ideas. If you’re interested in making a little side money from what you learn I have also found that there is a great benefit to learning multiple types of skills. Over time, you learn to combine the skills you learn and extrapolate them into other areas, producing some very unique stuff! For example, if you do some blacksmithing as well as woodworking you’ll likely start combining them at some point into products that very few smiths AND very few woodworkers would have the knowledge to make.
Joy:
I could probably keep going
for quite awhile on percieve benefits of learning to be a little more
self sufficient, make some things you value– or even just make them
because they are beautiful and provide an outlet to work with your
hands. But in reality it all comes down to just one thing…..
I’ve
experimented with sourdough bread off and on for about the last six
years, but only enough in the last year or so to get consistent,
repeatable, results. Or enough to REALLY understand what I’m doing
and why.
And that
bothers me.
I’m a
bread lover, a serious baker, and a bit of a foodie. I bake often, I
currently make a basic crusty sourdough loaf at least once a week,
occasionally a more flavorful artisan loaf as well, and we usually
have homemade rolls (many varieties), biscuits, breadsticks, muffins,
etc several times during the week. We grew up making everything from
scratch and– not to sound conceited, but– I’m a dang good baker.
When it comes to using commercial yeast and baking powder that is. I
still haven’t quite gotten to know the sourdough process well enough
to completely wean myself off of commercial products. However, I’ve
decided it’s time to truly master sourdough for more than just bread
loaves– Pitas, biscuits, pancakes, desserts, etc if it’s made of
flour I’m going to try it in sourdough! If you search the internet
you’ll find tons of sourdough recipes, enough that I really shouldn’t
feel the need to put one out there. There’s a hitch though, almost
all of them claim to be sourdough…. but still use yeast or baking
powder as well as starter. Which, I would definitely NOT call
sourdough– they are entirely dependent on the other leavening agents
and the starter is a bit of an afterthought in order to add some
flavor. Think about it this way, commercial yeast and baking powder
were both invented in the mid 1800s, how were things made prior to
that? They were certainly still making biscuits, bread, muffins, etc
before that! In my pursuit of good sourdough recipes I’m also trying
to find ones that are traditional and don’t depend on modern
leavening agents. Strictly sourdough.
Waffles
are my first foray into figuring out good, consistent
recipes/techniques for bread products OTHER than my weekly loaf. Why
waffles? If you have to ask that I don’t know if I can help you….
You either understand or you don’t. It’s a waffle for crying out
loud! Pretty much the ideal breakfast food of all mankind! Mmmm, just
thinking about them makes me happy….. But alas, there was another
reason for it.
My wife.
She loves waffles. It’s a toss-up whether waffles or pancakes are her
favorite breakfast. That’s probably explanation enough.
Unfortunately, she’s semi-gluten intolerant (gluten sensitive?) which
means that while I’m a bread lover, it isn’t quite the nirvana for
her that it is for me when I start baking. However, among other
health benefits I’ve also read that sourdough products are easier to
digest because the culture breaks down some of the wheat/gluten for
you. And she definitely has an easier time eating my homemade bread
than she does store bought stuff– she can’t eat grocery store bread
at all, but she usually does alright with homemade bread products
(they do randomly cause issues still, she’ll eat them fine for 2
months and then not be able to for awhile again. Really odd.). Heck,
I figured we might as well test it and see if she has an easier time
eating sourdough waffles compared to normal ones though.
So we’ve
been eating waffles frequently…. VERY frequently. To the point that
we may not want waffles for a few months (we’ll see how long that
actually lasts). I’ve made six different waffle recipes in the last
two weeks, which doesn’t sound like a lot but that means we’ve
essentially had waffles every other day for two weeks. And we were
experimenting with them less consistently before that too. But it
payed off! I finally have a go-to sourdough waffle recipe that I know
I like and can get consistent results with. Hopefully you like it as
well!
In my
mind the ideal waffle is crisp on the outside, fluffy on the inside,
dark, buttery, flavorful. And if we are going to make sourdough ones
I want to have just a hint of a sour tang to them. Some people want
their sourdough to taste just like normal ones, that’s fine and has
it’s place, but if I make sourdough, I want it to have a sour flavor.
We sampled many recipes and always had some sort of Goldilocks reason
for not liking them. Didn’t quite get crisp enough, too sweet, too
much vanilla, too many spices, too dense, not enough of a sour tang,
the list goes on and on. And don’t get me wrong, I liked most of
them, I just don’t feel like a standard recipe should be sweet (I eat
them for breakfast, not dessert), or heavily spiced. I’ll do that as
a variation if I get bored of basic waffles, but you need a good base
recipe to start with. Not surprisingly, the recipe we settled on is a
sourdough variation of the baking powder waffles my family has been
making for decades.
A note on
my starter: I keep mine in the fridge and don’t feed it very
frequently. In fact, I usually only ever feed it the day before I
bake with it and a little right before I put it back in the fridge.
And maybe a few days worth of frequent feeds to get it really active
if it starts to not perform very well. That was one of the things
that turned me off from using sourdough before, I was trying to feed
it everyday and it was too much of a hassle to maintain. That, and
most sourdough people tell you to toss a portion of your starter
every time you feed it, which seemed like a colossal waste to me. At
any rate, I take mine out the morning before I want to cook with it,
pour the alcohol off the top, scoop off the darker starter on top
where it has been in contact with the alcohol, and feed it a goodly
amount. Then I let it raise all day and take out however much I need
to use that night. Then I’ll feed it a little more and toss it back
in the fridge until next time. Easy peasy. I keep my starter roughly
the consistency of pancake/waffle batter already. If yours is thicker
or thinner you’re going to need to adjust the amount of milk or water
you use for this recipe.
Recipe:
½ cup
active sourdough starter
3 cups
whole wheat flour (I don’t bake with white flour… if you do you may
have to experiment with this recipe a little. White flour as a
generalization takes less water and a little more salt then wheat.)
2 ¾ cups
water or milk
3 eggs,
separated
1 tsp.
salt
½ cup
oil
1 Tbl.
honey/brown sugar
The night before I make waffles I combine starter, water/milk and flour in a bowl, cover and let sit overnight (10-12 hours) and allow the culture do its thing. The next morning, it should be nice and bubbly with a definite sour aroma. At this point I crack the eggs and put the whites in a separate bowl. Use egg beaters or a hand whisk to beat them until stiff. I’ve never had success with a blender for some reason but if you’re like me you will want to test that for yourself if you don’t have egg beaters. I have to use a hand whisk as I haven’t owned beaters in years. . . This takes a moment. At any rate, once your egg whites are stiff, combine everything else in a separate bowl and whisk together. Add this and the egg whites to your batter and fold it in. Don’t over stir. Cook fairly dark– that’s one thing I noticed about sourdough, it needs a little extra time to ensure it’s cooked all the way through. Serve with your favorite toppings (we usually do homemade yogurt and fresh fruit or jam. Molasses is also a favorite at our house– just a drizzle–and on special occasions we substitute real whipped cream for yogurt). Enjoy that bite of heaven! This recipe makes about 9 eight inch round waffles….. And they freeze great!
While the above recipe was our favorite, this recipe (https://breadtopia.com/sourdough-waffles-and-pancakes/) from Breadtopia was the runner up. It makes a very good, flavorful, crisp yet fluffy waffle. And for good reason. . . do you see how much butter is in it?? Mmmmm. Delicious. But I can’t justify using that much butter in a waffle recipe for normal occasions. Especially a recipe that small since I would have to double it for our family (I eat a lot). Butter is too expensive for me to do that. But I provide it here in case you want to try it out!
It’s a weekend!! Do you know what that means? That’s right,project time! The last few weeks I’ve had something I’ve wanted to do and things keep getting in the way: bathroom remodel, guests over the weekend,cleaning out the garage, etc. . .Actually, I have wanted to do this one for years, I think about it every summer when I see the Dyer’s Woad all dried out and going to seed, yet somehow I’ve never gotten to it. Having delayed this one for so long, I decided that THIS was the weekend it was going to happen: it’s time to attempt dyeing with Woad!
Woad (Isatis Tinctoria) is a weed around here, it was a
commercial crop intentionally planted by the pioneers (from what I’ve heard it
was one of the original dyes used to make blue jeans?), but it has since gone
feral and now is considered highly invasive. Not only that, but it has long
since been replaced by synthetic dyes so it doesn’t have much of a use anymore.
Ironically enough, I read about how people in Europe and Eastern U.S struggle
to grow this dye plant in gardens — here we’ve been trying to eradicate it for
quite some time and have had no luck. They even had a bounty on it for awhile
and would pay people to collect it by the trash bagful. Difficult to get rid
of. Which is a boon for those of us who like to use natural dyes as it is one
of the few really good blue dyes available! In fact, it was a major crop in
various parts of Europe as a valuable source of Indigo for centuries.
Fortunately, if you have woad growing in your area you’ll
recognize it immediately as it is quite distinctive with it’s drooping black
seeds on a dried out stem.
Unfortunately, it’s a biennial and by the time you see those black seeds it’s
already worthless. But hey, at least you will know it’s in your area and can
keep it in mind for next year! Actually, from the information I’ve been able to
find on extracting the dye, you want to use the 1st year leaves
anyway so if you find the dried stems you just need to look around and see what
you find nearby. 2nd year
leaves don’t contain much dye. … Even if not, I can see why it isn’t used as it
dries out so quickly it would be inconvenient to depend on.
Around here woad grows on drier hillsides, road cuts and
fields. Here in Utah if you remember seeing a lot of wild mustard or thistles
in an area it’s a good bet there’s woad growing there as well. I harvested mine
on a dry hillside just off a road. As you can see from the pictures there is
quite a bit of it and I collected a grocery bag full in about 20 minutes.
Originally I had great ambitions to do two batches, one of 1st
year leaves and one of 2nd just to see how much of a difference it
really made. As such, I collected about half a grocery bag of each. Of course,
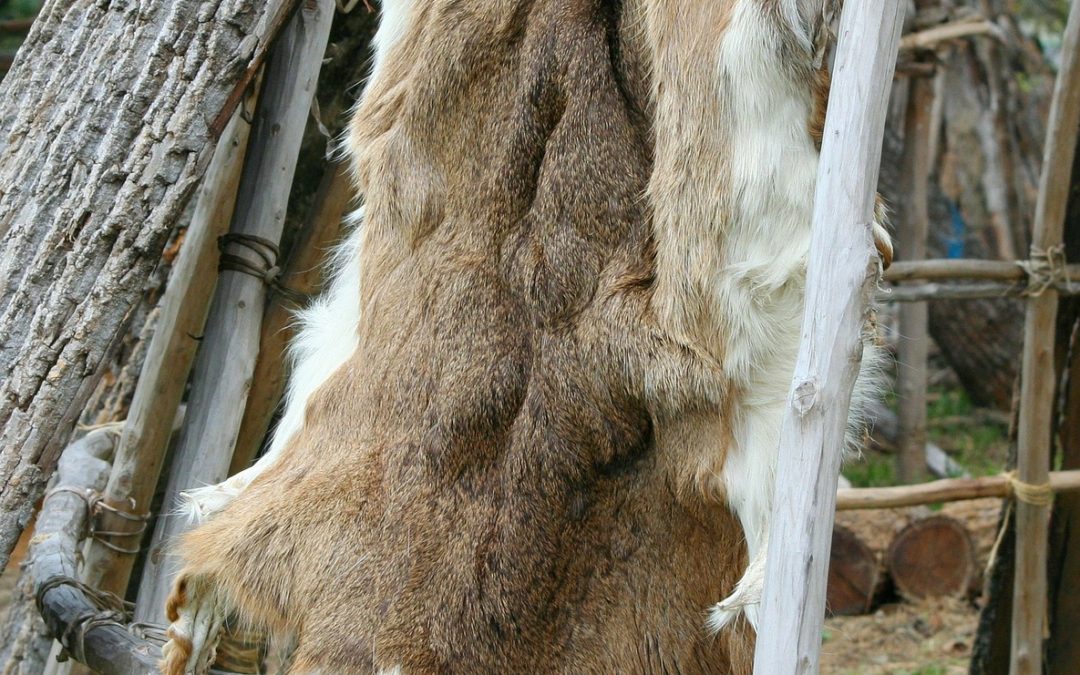
then while washing them I realized I had an elk hide out soaking in the
backyard that needed to be scraped that afternoon and a few other things that
needed to be done around the house. As such, that experiment got shut down and
I combined them all into one batch. Maybe next time eh?
When you locate some woad and harvest what you need the
first step is to wash it. Remove any other plant matter, dirt, etc that may
contaminate your dye. Then tear your leaves into smaller pieces to speed
extraction, I didn’t tear mine very small as I was in a hurry, I probably could
have gotten more dye out if I had shredded them a little finer. Put some water
on to heat while you wash; for this batch I used about a gallon of water and
that seemed to work fine with the amount of leaves I had. Keep an eye on the
water though as you don’t want it to boil. Aim for just below boiling prior to
adding the leaves, mine got up to 190 F before I turned it off. Steep the
leaves for 10 minutes just as you would a tea. Make sure everything gets
stirred under and watch the color change. It shocked me how dark the water got
in such a short amount of time. . . Not sure why that surprised me, what else
should I expect when extracting dye? The indigo dye you extract is heat
sensitive so you want to cool your dye off quickly once the ten minutes are up,
I filled my kitchen sink with cold water and added ice cubes, then drained and
refilled it again after that got warm. Strain the leaves out and discard. At
this point you hopefully have a pot of very dark greenish/brown water.
How do we go from green brown to a lovely blue dye? Change
the ph. You want to make this an alkaline solution (ph 9-10). I used washing
soda because I have some I use for making laundry soap, the other one you
frequently hear of people using is soda ash (a common swimming pool additive).
I doubt baking soda would be strong enough, but you can try it and let me know!
I dissolved 6 tsp of washing soda into one cup of water. Be careful with this
as a strong alkali will burn you just like a strong acid so take necessary
precautions.
After you add the soda, you’ll need to introduce some oxygen
to the solution in order to get the pigment to precipitate. Natural dyeing
websites will tell you to use an immersion blender dedicated to nothing but
dyes. . . Nice thought huh? Not having an immersion blender, let alone one
dedicated to things like this, I opted to use a cheap plastic potting bucket.
Fortunately I still had a few from planting the garden a few weeks ago! Just
dip it into the dye pot and pull it out, letting the solution stream out of the
holes in the bottom of the pot and back into the dye. Think up-sized version of
a fish tank aerator. Your solution should develop a foam on top, watch it
change colors from green to blue. Mine went blue after about two minutes of
aerating…. and then promptly went green again and stubbornly refused to go
blue again regardless of what I did. After aerating for 20 minutes I decided
that it was as good as I was going to get it, at this point it was a sort of
pale mint green color.
Your solution at this point will color things blue (as
evidenced by the picture of my fingertips), but it will not bind and stay
permanently. At this point water will still wash out the color, a highly
undesirable trait if you ever intend to wash whatever you dye with it! To make
it permanent you need to remove excess
oxygen from the solution. Traditionally, the dye vat was fermented for long
periods to allow the oxygen to dissipate (future project, I didn’t have time
this weekend). Modern dyers use chemical reducers such as spectralite to
accomplish the same thing in just a couple hours. I didn’t have any of that
laying around and, besides which, I have an aversion to using chemicals
(doesn’t that defeat the purpose of using a “natural” dye?) so I spent some
time searching for an alternative. The only suggestion I got was from the
Georgeweil(insert link here) website, which suggested using yeast to accelerate
fermenting the dye and reduce the oxygen content. Makes sense to me, if it
ferments my bread it should work just fine for dye right? We’ll see. I added 2
tablespoons bread yeast and 3 tablespoons of ordinary sugar to my gallon pot
and stirred it in. At this point georgeweil says to leave it for 48 hours, it
is now roughly 2:30 pm….
….. 4 pm the next day, I got impatient. Story of my life.
Amazing how that happens sometimes huh? How does the dye look? Well, I don’t
think I would get very many compliments if my shirt was that color. Kind of a
cross between the colors of pond scum/algae and sewage lagoons. Attractive, I
know. On the positive side, there is a scum of deep blue all the way around the
pot. Anyway, not having much in the way of white cloth around the house I
resorted to going to the store and buying a pack of cotton tee shirts to test
the dye with. I also scrounged up one of my sons’ plain white onesies,
hopefully this works or I may hear words from my wife about ruining it. . . I
soaked my articles in water for about an hour ahead of time to get them fully
saturated and allow the dye in quickly. Thinking ahead for once I just put in
one of the shirts to test the dye.
I left mine in for 20 minutes (aimed for 10 but then grabbed
some dinner while waiting) before pulling it out to let it air out. Supposedly
it will change from a green when you pull it out to a blue as it hits oxygen.
Mine didn’t, 15 minutes later still green. Hmmm….. attempting to figure out
what went wrong led to the wearingwoad (insert link here) website which told me
that green is often a result of the solution being too high of a ph. I guess 6
tsp of washing soda was too much…. lesson learned. Maybe I should get ph
strips next time to test it! Fortunately it also told me that giving it a light
rinse with vinegar should change my shirt to blue. So I dabbed my finger with
vinegar and touched the corner of the tee shirt. Success!! It is now a light
blue instead of green. I want a darker color so I returned it to the pot for
and repeated 10 min in 10 min out until I was satisfied with the hue. Then I
rinsed them out in cold water till before letting dry completely.
Before I put the shirt back in for a second time, I got to
thinking that maybe it hadn’t dyed very dark because the pigment had all sunk
to the bottom. After all, I had just let it settle for 26 hours. So I stirred
it lightly and put the shirt back in the dye. This time I definitely had some
streaks of darker blue as nice random highlights. Also, the color was more of a
blue green instead of just green, so maybe it helped. Regardless, every time I
let them air out they would look greenish yellow but as soon as I put them back
in the pot the would look blue again. When I rinsed them out after finishing,
my rinse water went all yellow and orange, and after that my shirts looked
blue. Which is logical, yellow and blue makes green. Apparently I had a lot of
loose yellow in my dye that didn’t bind? I haven’t read of anyone else having
this happen so maybe it’s just a product of the odd, cobbled together process I
used.
Rinse you’re dye project until the water runs clear and then
wash it to ensure you get any excess dye that hasn’t bound out (hopefully I
don’t have to tell you to wash this by itself….). Isn’t it a lovely color?
Tag/send me pics of your dye project, I’d love to see what you all made!
Earth, clay, soil, dirt. We’re always trying to remove it, clean it, wash it out. . . Not this week!
I’ve known for years that natural earth pigments were frequently used as paints and stains in pre-modern times. But alas, knowing something was done doesn’t mean knowing how. What really needs to be done to make dirt stick permanently? I’ll admit, I had no idea what I was doing and how to get started with using earth pigments– so I plunged right in!
I would like to say this project was planned and mapped out ahead of time, no such thing. I did something which comes a little easier to me… I winged it! I was out on the mountain hunting elk a few months back and came to a spot in the road where the dirt was a bright reddish/orange color and was really fine and ‘poofy’. Actually, I didn’t actually register it as dirt initially– when I came around the corner onto an open hillside and noticed a red powder all over the vegetation near the road my first thought was that it was fire retardant from wildland firefighters. It was that bright and unnatural looking. Only thing was that there hadn’t been a fire close to there all summer so if they were dropping retardant they really missed the mark…. I kept driving though and pretty quickly came to this spot on the hillside where the red dirt was showing. Looked like any time someone drove that road it created a red dust cloud that settled on everything nearby and gave it this weird color. Naturally, of course, I popped out of the truck and collected a few handfuls in a spare grocery bag. Who knows when you might need colored dirt right??
In my defense I did have a project in mind for it, I was planning on using it as a colored slip to paint some designs on pottery…. Colorful soil like this is not common where I live and it would make a nice contrast to the local clay. Yet somehow that project never ended up happening and I’ve had a sack of dirt sitting around on my shelf for two months. Every now and then I start to wonder if I’m a hoarder– who has sacks of dirt sitting on their shelves for months?? Sadly, most of the stuff I collect isn’t even finished, mainly just materials to make something out of! I finally decided it was time to do something with it when I saw the bag sitting there couple days ago. Weekend project!
When I was younger my brother and I both had “dirt shirts” from Hawaii that were dyed (stained? Is dirt technically a dye?) with local dirt. His was a rusty shade of red (a pretty common soil color in that area) while mine was a blueish aquamarine (a color that would cause me to stop and do some serious questioning if I ever saw soil that looked like it. . .). At any rate, I decided to attempt making my own version and see what I thought of the process.
Having no experience with dyeing with dirt my game plan was pretty simple– add water and drop a t-shirt in. KISS right? Essentially, that’s as easy as it was. I did use a little vinegar to help set the color (frequently used as a pre-treatment when using natural dyes) but other than that all I did was set the shirt in a dirt slurry. That’s the abbreviated version if you want to stop reading now.
For those of you slightly more interested in details. Starting from the top: filter out the larger rocks, twigs, etc to make it easier on yourself. It’s really only the ultra fine particles that are going to be binding to the fabric anyway, might was well not make it too uncomfortable to be playing around in. Not that it matters since you won’t be collecting dirt from the same spot I did if you want to try this… but I measured all my ingredients so I can adjust things in the future if the color isn’t quite what I wanted. At any rate, I measured out 4 cups of dirt into a metal bowl and then added two cups of water and one of white vinegar. I have no idea if vinegar was necessary, I’ve used it in creating vegetable dye baths and know it is used to help a color stick to fabric so I thought I would add it just in case. Basically make a dirt shake, or maybe even a slightly thinner consistency. Now dampen the t-shirt and work it in…. mix it around until it is thoroughly saturated and completely covered or the stain my come out uneven. Which could be an interesting look too I guess. I left mine for about 2 ½ hours before I came back and rinsed it out. Not sure if longer leads to darker colors or not– sometime I’ll have to experiment with that! After you’ve given it ‘sufficient’ time (whatever that is to you) rinse it out thoroughly with the hose. Once you seem to have it clean go throw it in the washer and run a load by itself. After doing this the first time I decided it was a little light (colors fade when washed the first couple times) and put it back in the mud for another few hours to soak again and see if I could make it
darker. It had been a nice rusty brown when rinsed with the hose…. and started looking light peachy orange after going through the washing machine. The second time around it did seem to darken some, but is still a little lighter than I would have preferred. Not sure if that is simply the color that dirt creates or if I can adjust my process to extract a darker color from it. Overall though, I’m pretty pleased with how it turned out!
Do you have a local spot with interesting dirt/clay? Try staining something and send me a picture, I would love to see what colors you get from your local soil! Or if you have experience dyeing or staining with dirt I would love to hear the process you use and any insight you have. Dyeing with dirt turned out to be a pretty fun and laid back process, give it a shot and let me know what you think! Maybe next summer I’ll go back and get some for pottery….
Last summer I read an old pioneer account of settling the region I live in and was intrigued by a brief reference to making maple syrup from the Box elder trees that grow in the area. Interesting to note, I logged that tidbit in the deep recesses of my mind and then promptly forgot about it. And then later that fall I read Edible Native Plants of the Rocky Mountains by H.D Harrington and Stalking the Wild Asparagus by Euell Gibbons both of which also mentioned tapping Box elders for syrup….. Hmmm, I thought, this may be worth some contemplation. Real maple syrup is expensive. Exceedingly so. So much so that I cannot afford it. But Box elder trees are relatively common near the streams and on the low foothills….
I’ve actually been curious about tapping trees to make syrup or sugar for years, my brothers and I did it once when we were kids and tapped a maple tree in the city park. Not sure what the rest of the city thought of that, but it was an interesting experience for us. Needless to say, since we only tapped one tree and we tapped too late in the year the result was less than impressive once we got it all boiled down. Very little remained. And with 10 people to divvy it up amongst the reward was rather diminutive. Not enough, at least, to maintain our interest– we never tried again. It seems about time I give it another shot!
If you’re like me you’ve probably always considered maple syrup to be a thing of the northeast– a luxury relegated to those who are blessed enough to live in a region that abounds with maple trees. Why is that though? You can find some sort of maple growing (sparsely) in virtually every region of North America. After doing a little more poking around I also found accounts of folks tapping trees for syrup across the entire continent too. It makes sense, back in the day there were really only two good sources for sweetner in northern climes– bees and trees. If your options were to either tap and use whatever trees you had on hand or go without any sweets for a year which would you choose? I also found a few references to tapping various other deciduous trees– birch, walnut, hickory, pecan, elm, alder, etc. You don’t even need a maple tree! So why has the tradition of tapping and sugaring been lost across most of the country? Good question… Poor yield of alternative species? Unimpressive flavor? The low cost and ease of acquiring sugar in modern life? Who knows, but this is one heritage skill I’m going to acquire this year!
While I’ve read a few accounts of tapping other species, and have nothing against trying them, I’m still tapping maples for my foray into making syrup. Primarily due to the lack of hardwood trees around here (I live in a high desert). Bigtooth Maple and Box Elder (a maple– albiet an odd one) are some of the only options we have outside of the city (and for the time being I would rather not be tapping the trees in the neighbors yard. . .). Both of them grow reasonably abundantly near streams and in shaded draws, neither one of them tend to get very large though. Most Bigtooth maples around here are only 4-6 inches in diameter, which is a little too small to be tapping. Looking around I managed to find a few candidates that were both large enough and in a location that is not totally conspicuous from the road.
Taps in! Actually tapping the trees is remarkably easy, you don’t need to worry about this one being a time intensive activity. Take the kids, they’ll enjoy it– or at least my 2 year old did! All you need is a drill, spiles, appropriate sized drillbit, and some buckets. I ordered 4 stainless steel spiles from Tap My Tree and put them out the other day, I was getting about a gallon of sap per day from 3 trees and one tree is producing about half that. Sadly, I only had a few days of good flow before it started getting too warm here– I was busy with other things and tapped too late in the season. I had wanted to make a few different homemade spiles to test out, something that will have to wait until next spring now! For the buckets I just went to the dollar store and bought some 1 gallon buckets they have out in preparation for easter. . . very spring-ish. I would love to have some metal pails that you see in pictures of other people out tapping, but alas, I couldn’t find anything like that around here. So cheap easter buckets it is. Lids would be nice, but I really didn’t get too much bugs, bark, etc in them and so I didn’t worry about rigging some up. My other thought for collection containers (and it may be a little less gaudy out on the trees) is to reuse plastic milk jugs or buy 1 gallon jugs of water and then use the container. Both of which would also be inexpensive to procure. Actually, I would prefer to have buckets/containers that were a little larger, I had days where my 1 gallon buckets actually overflowed and have considered going out twice a day to empty them and prevent that from happening. Which surprised me, I’ve read accounts of people getting much more than that from large sugar maples back east, but I didn’t really expect to get that much sap from the small-ish trees I’m tapping.
So what time of year do you tap? How do you know when to stop? Sap will flow best when the weather in your area is above freezing during the day and below freezing at night. You’ll get very little sap once the temperatures stop dropping below freezing at night. Not enough to make it worth checking (I was down to about ¼ gallon per tree over the last few days). The process is simple though, take your drill and drill a hole about 2 inches deep into the sunny side of the tree on a slight angle so that the sap will run out. Use a finger to clean out any sawdust and then gently tap your spile into the hole with a hammer and hang your bucket. That’s it! You need to come back and empty them daily, but it is a very laid back enjoyable activity if you’re only tapping a few trees for personal use (I imagine doing it commercially can be a little hectic!). I collect and empty mine into a food grade 5 gallon bucket (look in the food storage/bulk food section of your local grocery store). The nightly temperatures here were cold enough to freeze the sap pretty solid in the buckets when I started, which makes them difficult to empty in the mornings– as such, I began timing my daily sap run to happen in the afternoon/evening so I don’t have to try and chip it out of the bucket. No sense making life more difficult than it needs to be. Hopefully you still have time to tap a few trees yourself this year, if not, give it a go next year! Experiment a little, and if you tap something other than a maple I would love to hear how the taste compares!
There are a few other modern references that may interest those of you who are interested in making syrup from trees other than maples. Mother Earth News has an article from the 1970’s that talks about making syrup in the pacific northwest from maple, birch and alder (and also mentions nut trees), mapletapper.com also seems to be a reliable source for information on using a few different species of trees and gives more detailed information on how processing birch sap into syrup differs from using maple sap. And lastly, this site lists a number of different trees that can be tapped– and while many listed are varieties of maple they do talk about the flavor differences in a couple different species that some of you may find interesting.